

Creating a 2D Sprite
Drawing your first sprites to the screenCreating a 2D sprite and getting it displayed on the screen is a very quick and painless process using the XNA framework, so let's get started!
Creating the new game project:
First, let's start by opening XNA Game Studio Express and creating a new Windows Game project. If you are having trouble remembering how to create a new XNA Windows Game project just follow the steps in this tutorial here and come back to the this tutorial after you've refreshed your memory.
Adding the images:
Now, let's add the images that we are going to be using in this tutorial to the game project. You can download the images used in the project from here. If you are having trouble remembering how to add images to an XNA Game project, just follow the steps in this tutorial here and come back to this tutorial after you've refreshed your memory.
Drawing the Sprite on the Screen:
On to the code! To begin with, let's add a class level variables to store the texture and it's position. If you're a bit confused by the terms "class", "variables" or other coding terms, now would be a good time to stop and head on over to this FAQ on the Creator's forums to brush up on your C# coding skills. Trying to learn both how to program in C# AND learn how to use the XNA framework and how game development works will become overwhelming fast! You won't need to become a C# expert, but you should at least go learn the basics first.
Create some objects
Go ahead and add this code to the top of the Game1.cs class.
Vector2 mPosition = new Vector2(0, 0);
Texture2D mSpriteTexture;
Vector2 is a object provided by the XNA framework. It is used to store 2D positional information. Texture2D is another object provided by the XNA framework. It is used to hold image content loaded by the Content Pipeline. Both Vector2 and Texture2D objects will be used a lot in 2D game development with the XNA framework so it's good to become very familiar with them.
Load the content
Now, let’s go ahead and load our texture. We’ll do this by adding some code to the “LoadContent” method. You don't need to create the "LoadContent" method, it's already created as part of your Game1.cs class when you create your Windows game project. We will just be adding a new line of code to this method to load our sprite texture.
protected override void LoadContent()
{
// Create a new SpriteBatch, which can be used to draw textures.
spriteBatch = new SpriteBatch(GraphicsDevice);
// TODO: use this.Content to load your game content here
mSpriteTexture = this.Content.Load<Texture2D>("SquareGuy");
}
The line we added, uses the Content Manager to load the "SquareGuy" image we added tot he project into our Texture2D object.
Draw the sprite
With the Texture2D object loaded, we can now draw our sprite tot he screen. All of your drawing should be done in the "Draw" method. This is another method that already exists in your Game1.cs class. It is created when you first create a new Windows game project.
Add the following code to the "Draw" method.
protected override void Draw(GameTime gameTime)
{
graphics.GraphicsDevice.Clear(Color.CornflowerBlue);
// TODO: Add your drawing code here
spriteBatch.Begin();
spriteBatch.Draw(mSpriteTexture, mPosition, Color.White);
spriteBatch.End();
base.Draw(gameTime);
}
The spriteBatch object is automatically created when you make a new Windows game. SpriteBatch objects are what is used to draw 2D images to the screen. To use them, you first have to initiate "drawing" by calling "Begin".
Next, you draw all the images you want. In our case, we're currently just drawing a single sprite to the screen, but some games might have hundreds or thousands of "Draw" calls. With our "Draw" call, we pass in the sprite texture we want drawn. The position in the game screen we want it drawn in (our current position is X=0 and Y=0) and what color we want to shade our sprite (using White, tells the SpriteBatch object that you don't want to apply any shading to the texture).
Finally, you tell the SpriteBatch object that you've added all the things to the scene that you want drawn and you tell it to go ahead and draw them all by calling "End".
And that’s that. Build ![]() your game and give it a go. You should see the Square Guy sitting in the upper left of the game window. Just click the Close button on the game window to stop the game.
your game and give it a go. You should see the Square Guy sitting in the upper left of the game window. Just click the Close button on the game window to stop the game.
![CropperCapture[265]](http://www.xnadevelopment.com/livewriter/XNADevelopment.comCreatinga2DSprite_C271/CropperCapture265.jpg)
Changing the Position of the Sprite
The position of our sprite is stored in our Vector2 object we created mPosition. To draw the sprite in a new location, just change these values. Go ahead and play with these values and see how they work. Change the X position, then the Y position. When you change the line of code to look like this. Where is it drawn?
Change this line of code.
Vector2 mPosition = new Vector2(250, 100);
Now click Build ![]() and see where the sprite is drawn.
and see where the sprite is drawn.
Making a "Sprite" Class
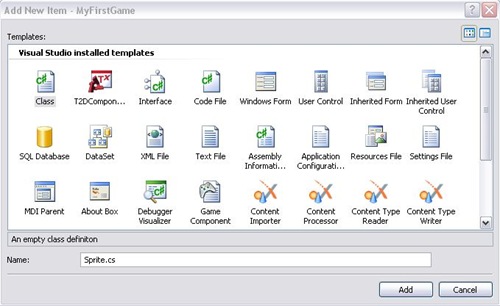 Now that you understand how to draw an image to the screen. Let's work on creating a "Sprite" object so it's easier for us to work with multiple sprites. Start by right-clicking on the project, pick Add -> New Item.
Select "Class" from the "Add New Item" dialog and then type in the name "Sprite" into the Name text box. Click the "Add" button when you are finished.
This will add a new class to your game called "Sprite" we are going to use this class to create Sprite objects in our game.
When you created the new class, the code window for the class should have opened. We are going to be working with some XNA Framework objects, so we will need to add the following "using" statements to the top of the class file.
using Microsoft.Xna.Framework;
using Microsoft.Xna.Framework.Content;
using Microsoft.Xna.Framework.Graphics;
Next, just like we did in the Game1.cs class when we were learning to draw an image to the screen, we are going to add two storage objects to the Sprite class to be used in the same way.
Add the following code to the top of the Sprite class (I included the class declaration and name for reference of where you need to add the code).
class Sprite
{
//The current position of the Sprite
public Vector2 Position = new Vector2(0,0);
//The texture object used when drawing the sprite
private Texture2D mSpriteTexture;
You can see that there is a little difference for how we declared our objects. We made the Position object Public and the Texture2D object private. This means that the Position can be changed by things outside of the class and the Texture can not. If you're a little confused by terms like "Public" and "Private", you might want to go do some more training on C#.
We are now going to mimic the Game1.cs class a bit and create our own "LoadContent" method for our sprite class. This method will do for the sprite exactly what the LoadContent method does for the Game1.cs class.
Add the following method to the Sprite.cs class.
//Load the texture for the sprite using the Content Pipeline
public void LoadContent(ContentManager theContentManager, string theAssetName)
{
mSpriteTexture = theContentManager.Load<Texture2D>(theAssetName);
}
You can see that the LoadContent method for our Sprite class takes in some parameters. The Sprite class does not have a ContentManager to do it's loading so it "asks" for one. It also wants to know the name of the asset that it should load into it's Texture2D object. Both of those values will be passed in when the LoadContent method is called. So now our content is loaded for the sprite, we now need to Draw it. We will once again copy the way the Game1.cs class works and add a "Draw" method to our Sprite class.
Add the following method to the Sprite.cs clas
//Draw the sprite to the screen
public void Draw(SpriteBatch theSpriteBatch)
{
theSpriteBatch.Draw(mSpriteTexture, Position, Color.White);
}
Since the Sprite class does not have it's own SpriteBatch (it's a good idea to try and limit the number of SpriteBatch objects you are creating for your game), the Draw method in our class will ask for a SpriteBatch object that it should use for drawing itself.
We have now created our Sprite class. You should be able to Build ![]() the project with no errors now and the Image should still draw BUT it's not being drawn by our new Sprite class, we just haven't removed our old code yet.
the project with no errors now and the Image should still draw BUT it's not being drawn by our new Sprite class, we just haven't removed our old code yet.
Using the new Sprite Class
We will now modify the Game1.cs class to use the new Sprite object we have created. To begin with, delete the following lines of code from the top of the Game1.cs class.
Vector2 mPosition = new Vector2(250, 100);
Texture2D mSpriteTexture;
Now, add the following line of code to the Game1.cs class. This will be our Sprite object.
Sprite mSprite;
Next we want to "create" our Sprite object so that it's ready to be used in our Game1.cs class. To do that, add the following line of code to the "Initialize" method. The Initialize method is another one of those methods already created for you when you make a new Windows game.
protected override void Initialize()
{
// TODO: Add your initialization logic here
mSprite = new Sprite();
base.Initialize();
}
With our Sprite object created, we now need to load it's content. We will do that by calling it's LoadContent method from within the Game1.cs LoadContent method. We will be adding a new line of code and removing the previous code we had written in the LoadContent method.
Modify the LoadContent method to look like this.
protected override void LoadContent()
{
// Create a new SpriteBatch, which can be used to draw textures.
spriteBatch = new SpriteBatch(GraphicsDevice);
// TODO: use this.Content to load your game content here
mSprite.LoadContent(this.Content, "SquareGuy");
}
Calling that will load the SquareGuy asset into the Texture2D object in our Sprite class. Now we just need to Draw the Sprite to the screen. To do that, modify the Game1.cs Draw method to look like this.
protected override void Draw(GameTime gameTime)
{
graphics.GraphicsDevice.Clear(Color.CornflowerBlue);
// TODO: Add your drawing code here
spriteBatch.Begin();
mSprite.Draw(this.spriteBatch);
spriteBatch.End();
base.Draw(gameTime);
}
We removed the previous draw code we had written and instead are now calling the "Draw" method of our sprite object. When you click Build ![]() now you should see that happy little Square Guy in the upper left of the screen. The difference is, this time you've written the code to be a little more Object Oriented and so it's a little more reusable for future projects.
now you should see that happy little Square Guy in the upper left of the screen. The difference is, this time you've written the code to be a little more Object Oriented and so it's a little more reusable for future projects.
Positioning the Sprite object
To position the Sprite, we will add a new line of code to the LoadContent() method. Modify the LoadContent() method to look like this.
protected override void LoadContent()
{
// Create a new SpriteBatch, which can be used to draw textures.
spriteBatch = new SpriteBatch(GraphicsDevice);
// TODO: use this.Content to load your game content here
mSprite.LoadContent(this.Content, "SquareGuy");
mSprite.Position = new Vector2(125, 245);
}
This changes the Position of the sprite so that when the Sprite draws itself, it uses the new positioning information you gave it. You can also change just an individual X and or Y position of the Sprite by writing code like this.
mSprite.Position.X = 200;
mSprite.Position.Y = 300;
Just another way of accessing and changing the positioning information of your sprite. With the new positioning information you have given the Sprite, go ahead and Build ![]() now and watch where the Sprite is drawn.
now and watch where the Sprite is drawn.
Drawing multiple Sprites
Now that we have our sprite class, adding a second Sprite to the game is really easy. To add a second sprite, just follow the following steps.
- Add a new Sprite object to the top of the class, maybe call this one mSpriteTwo. Sprite mSpriteTwo;
- Instantiate a new instance of the Sprite in the Initialize method of the Game1.cs class. mSpriteTwo = new Sprite();
- Call the LoadContent method of your new sprite object in the LoadContent method of the Game1.cs class. mSpriteTwo.LoadContent(this.Content, "SquareGuy");
- Give the new sprite a new position (if you give it the same position, you won't see it since they will be drawn on top of each other). mSpriteTwo.Position = new Vector2( 300, 100);
- Call the Draw method of your sprite object in the Draw method of the Game1.cs class. mSpriteTwo.Draw(this.spriteBatch);
Now go ahead and Build ![]() your game, you should now see two sprites drawn to the screen in the locations you have given them. Do you think you could add a third?
your game, you should now see two sprites drawn to the screen in the locations you have given them. Do you think you could add a third?
![CropperCapture[266]](http://www.xnadevelopment.com/livewriter/XNADevelopment.comCreatinga2DSprite_C271/CropperCapture266.jpg)
That's it, congratulations on getting your first (and second!) sprite drawn to the screen! It might not seem like a lot, but this is the first step in building up some of the basic concepts you will need for making your first game. Go ahead and experiment a little. If you get stuck on something, take some time to search the forums and see if you can figure it out. Most of all, make sure you're having some fun!